Scheduled maintenance and cleaning are prerequisites for a long service life and trouble-free operation. The maintenance cycle is usually three months. If the device is operated for more than 8 hours a day, the maintenance intervals should be changed as needed.
Health risk caused by inhaling harmful dust The device contains harmful dust that can collect on surfaces and penetrate the ambient air as of the first use. It can damage the respiratory tract when inhaled. Check and wear your personal protective equipment. Use the device only in rooms with forced ventilation. Ensure that all seals on the device are free from dirt and debris. The provided filtration system must be used when operating the device. The dust collecting drawer must be closed when operating the device. Do not open the dust collecting drawer until at least one minute has passed since the device was switched off. Keep the device closed during operation and during the cleaning process. Immediately remove dust deposits from the environment with a dust class H industrial vacuum cleaner or a damp cloth. |
Electric shock due to defective cables Damaged or improperly installed cables can lead to fatal electric shock. Check all live cables and connections for proper installation and damage. Damaged, deformed or worn parts should only be replaced by a qualified electrician. |
Risk of injury due to unexpected start If power is supplied during maintenance, cleaning or disassembly, rotating parts can start running unexpectedly and lead to injuries from cuts. Switch off the device. Disconnect all electrical connections. |
Maintenance and cleaning intervals
Authorized personnel must clean and inspect the device regularly. Any dirty device components that cannot be cleaned adequately must be replaced. The dirty components must be placed in bags that are impermeable (so dust cannot escape) and disposed of in accordance with regulatory stipulations. The specified intervals are standard values and refer to single-shift operation. We recommend recording the inspections. The date of the inspection, the detected defects and the name of the inspector must be observed.
Daily | Check the device, filter housing, cable connections, and seals for visible damage. Empty the filter housing. |
Monthly | Check the filter cartridge for leaks or contamination. Check the exhaust air filter for leaks and contamination and replace if necessary. Replacing the exhaust air filter Check the filter pad for leakage or contamination and replace if necessary. Carbon brushes must be checked and replaced as needed only by a qualified electrician. |
Yearly | Turbines must be checked, cleaned and replaced as needed only by a qualified electrician. Replace the exhaust air filter. |
Risk of material damage due to improper filter cleaning Improper filter cleaning can damage the filter elements. The result may be insufficient extraction. Use only dry and oil-free compressed air (min. 5 – max. 6.5 bar). The filter should be cleaned at least once per work shift, depending on how often the system is used. Clean the filter immediately when the <Dirty> LED lights up on the control panel. |
Video 3Cleaning the filter
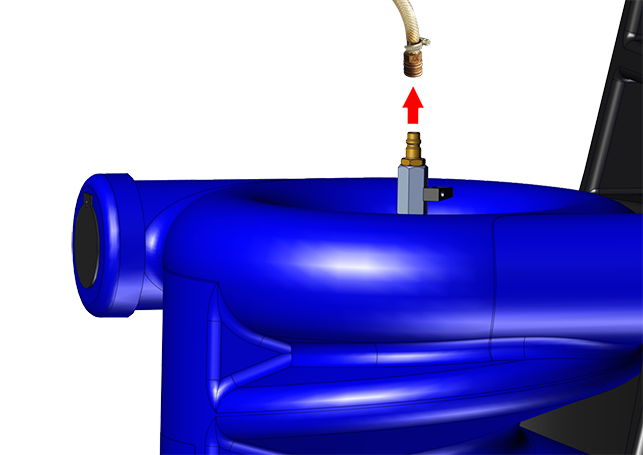
1Connect the compressed air supply. | |
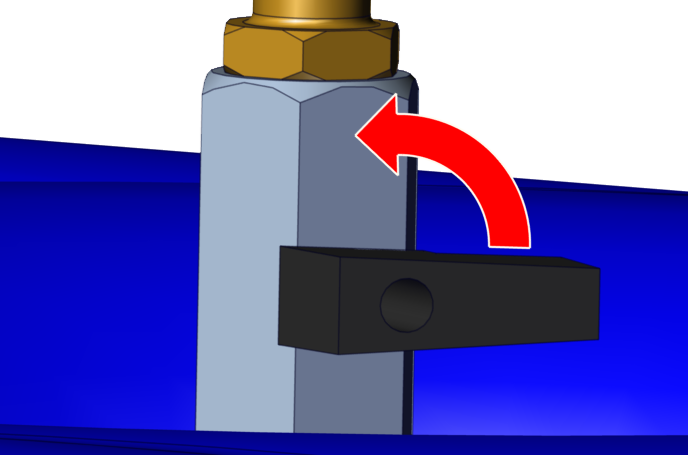
| 2Open the valve lever on the compressed air connection. The compressed air creates a dedusting jet and causes the dedusting nozzle to rotate inside the filter cartridge. |
3Manually move the cleaning lance up and down multiple times. The filter cartridge is cleaned by manually moving the cleaning lance up and down. | |
| 4Close the valve lever on the compressed air connection. |
| 5After the system has been cleaned, disconnect the device from the compressed air supply again. |
6Empty the separated welding fume particles from the filter housing in the supplied dust collecting bag. 7Dispose of the dust collecting bag in accordance with local regulations. |

| 1Remove the cap. |
2Attach the dust collecting bag to the disposal opening. | |
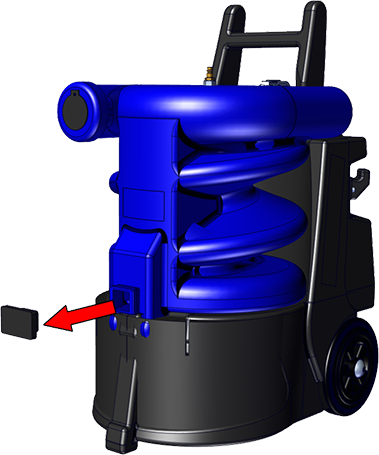
3Unlock the latch between the filter housing and the housing. | |
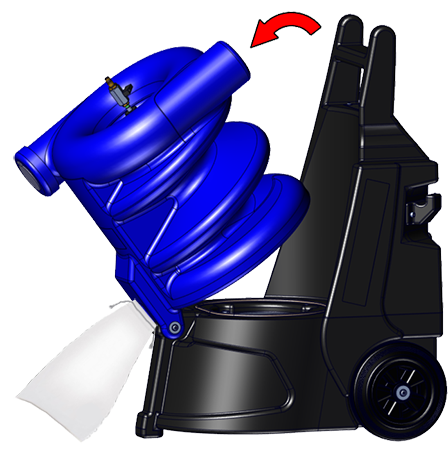
| 4Tip the filter housing forward and empty the filter housing completely of dust into the dust collecting bag by tapping on it. |
| 5Tip the filter housing backward. |
6Lock the latch between the filter housing and the housing. | |
7Remove the dust collecting bag from the disposal opening and seal it. 8Dispose of the dust collecting bag in accordance with local regulations. 9Put the cap back on. |
If the <Dirty> LED illuminates after repeated cleaning, the filter must be replaced.
Dedust the filter cartridge before changing the filter and empty the filter housing.
Cleaning the filter and Emptying the filter housing
Video 4Replacing filter cartridges
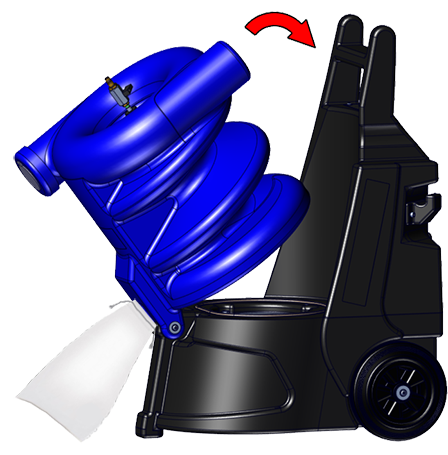
1Unlock the latch between the filter housing and the housing. | |
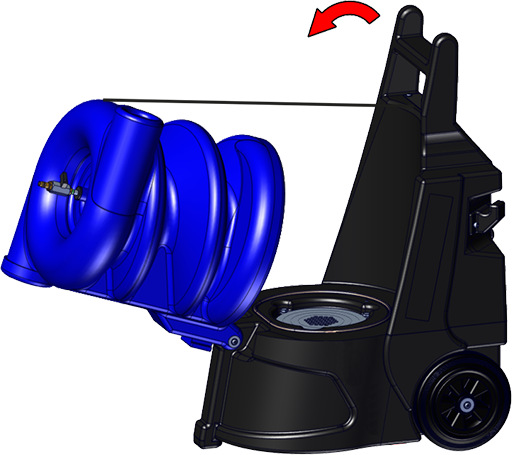
| 2Tip the filter housing forward. |
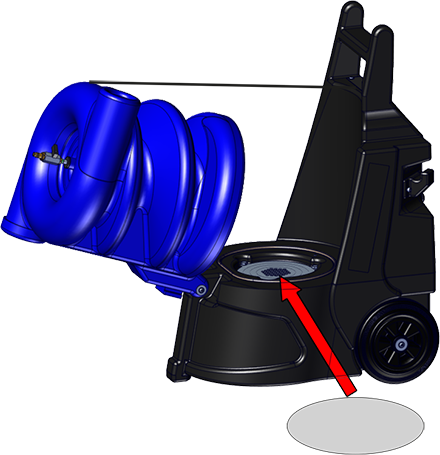
| 3Place the protective underlay on the cover plate of the extraction system for protection. |
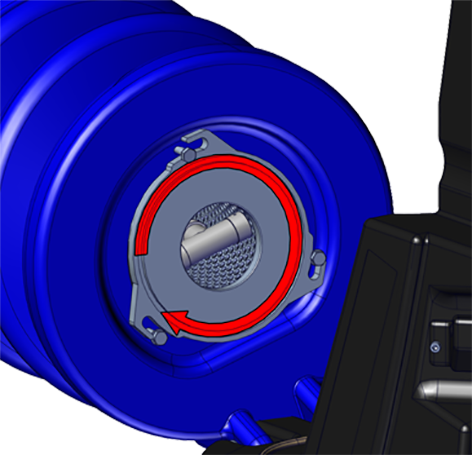
4Loosen the mounting screws on the filter cartridge. | |
| 5Unlock the filter cartridge by turning it clockwise. |
6Carefully pull the filter cartridge from the filter housing. | |
7Place the dust collecting bag (included with the new filter cartridge) over the filter cartridge as soon as the filter cartridge protrudes a few centimeters from the filter housing. 8Close the dust collecting bag as soon as the filter cartridge is completely inside. 9Carefully remove the protective underlay and pack and seal it in the dust collecting bag. 10Dispose of both dust collecting bags in accordance with local regulations. 11Pull the cleaning lance all the way up so that the spacer rests completely on the housing. 12Insert the new filter cartridge in the tipped filter housing. 13Center the filter cartridge using the spacer and mount it in reverse order with a tightening torque of 10 Nm. 14After mounting the filter, check that the cleaning lance moves freely. |
Replacing the exhaust air filter
The exhaust air filter must be replaced if there is heavy contamination, damage or after 12 months of use at the latest.
Video 5Replacing the exhaust air filter
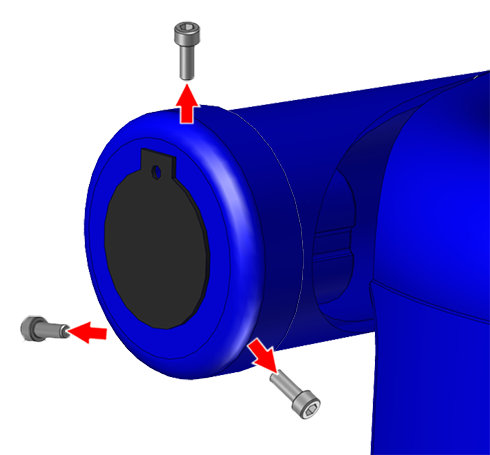
| 1Loosen the mounting screws on the cover. |
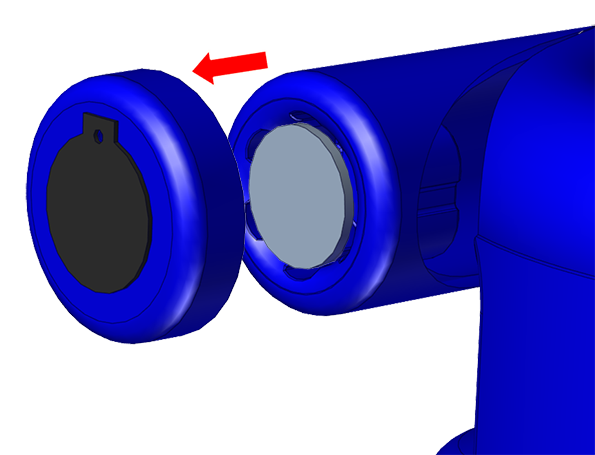
| 2Remove the covers from the air vents. |
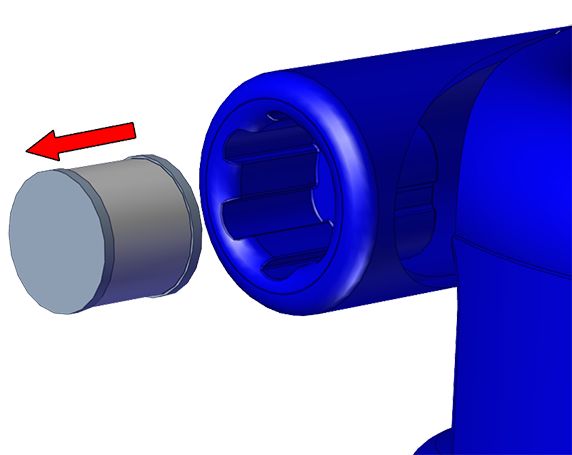
| 3Remove the dirty exhaust air filter and pack it in an empty dust collecting bag. |
4Dispose of the dust collecting bag with exhaust air filter in accordance with local regulations. 5Insert the new exhaust air filter and mount in reverse order. |
AHousing | |
|---|---|
1Place a protective underlay E (fleece, cardboard, blanket, or similar) on the floor. Ensure it is large enough for the area you want to protect.
2Place the device with the rear side F on the protective underlay E.
3Loosen the mounting screws D of the cover grille C with an Allen key AF5.
4Remove the cover grille C.
5Remove the filter pad B.
6Dispose of the filter pad B in accordance with local regulations.
7Insert the new filter pad and install the cover grille with a tightening torque of 7 Nm.
8Insert the mounting screws D.
9Tighten the mounting screws D with an AF5 Allen key.
10Set the device upright.
11Remove the protective underlay E.
1Loosen the screw on the latch with an Allen key and remove it.
2Remove the latch.
3Remove the strap.
4Insert the new strap.
5Replace the latch.
6Insert the screw and tighten it with an Allen key.
1Pry off the Starlock cap with a screwdriver. | |
2Remove the wheel from the axle. | |
3Place a new wheel on the axle. | |
4Place the Starlock cap back on the wheel. |
1Tilt the housing forward and remove the filter cartridge. 2Pull the cleaning lance out of the filter housing as far as it will go on the top of the device. | |
3Loosen the threaded fitting on the tube with a combination wrench (AF18 and 22) and remove the ball valve, nipple and threaded fitting. | |
4Remove the cleaning lance from the bottom of the tilted filter housing. | |
5Insert the new cleaning lance from below into the filter housing and pull the cleaning lance out of the filter housing as far as it will go on the top of the device. | |
6Loosen the threaded fitting on the tube with a combination wrench (AF18 and 22) and mount the ball valve, nipple and threaded fitting. | |
7Insert and fasten the filter cartridge and close the housing. |